Step by Step instructions about how to add a new member are included in the online CLMS2Web documentation.
How Do I Add a New Member?
New members must be added to your roster as candidates before they can be added as members. This is true even for transfers and reinstatements. To add a new member to your lodge roster, follow these steps:
- Click the Roster Tab to display the Control Panel.
- Click the link labeled "Add a New Membership Candidate."
- Select the type of candidate you're entering: brand new member, transfer, reinstatement, etc.
- Type the required information. (Required fields are displayed in bold text.)
- Click the SUBMIT button.
- Supply the application date, and any other dates that may have already transpired. Click the SUBMIT button.
- Enter the application fee. (If applicable). Click the SUBMIT PAYMENT button.
That's it! Based on the information provided, a new record has been added to the appropriate candidate folder for additional processing.
How Do I Process Membership Candidates?
Based on the current status of their application, candidate records are stored in one of several "folders" that can be accessed through the "Roster" tab of the main menu, or from the Control Panel. Click the link labeled "Process Candidates" to access these folders:
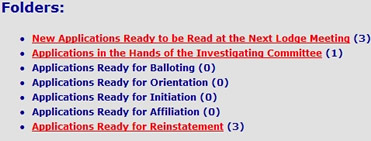
As a candidate completes each step of membership process (application, investigation, balloting, etc.) they move into the next applicable folder. Let's get started:
- Click the link labeled "New Applications Ready to be Read at the Next Lodge Meeting."
- Click the "Propose" button next to the name of the candidate you'd like to process.
- Type the date the candidate was proposed, and the name of the proposer. Click the "Submit" button and the candidate will be transferred automatically to the next applicable folder. After this you can either continue processing new applications (if any), or click the link labeled "Investigating Committee" to move on to the next folder.
- In the "Applications in the Hands of the Investigating Committee" folder you'll see a list of all the candidates currently being investigated. These can be processed together by typing the investigation date, and then clicking the checkbox next to the name of all the candidates who were investigated on that date. Click the "Process Candidates" button to advance these candidates automatically into the next folder.
- In the "Applications Ready for Balloting" folder you'll see a list of all candidates awaiting election. These can be processed together by typing the election date, and then clicking the checkbox next to the name of all the candidates who were elected on that date. Click the "Process Candidates" button to advance these candidates automatically into the next folder.
- In the "Applications Ready for Orientation" folder you'll see a list of all candidates awaiting orientation. These can be processed together by typing the orientation date, and then clicking the checkbox next to the name of all the candidates who were given orientation on that date. Click the "Process Candidates" button to advance these candidates automatically into the next folder.
- In the "Applications Ready for Initiation" folder you'll see a list of all candidates awaiting initiation. Click the "Initiate" button next to the name of the candidate you'd like to initiate.
- Type the initiation date, and make sure the system has provided an appropriate membership number for the new member. (In CLMS2, candidates are automatically assigned the next available membership number. You can override this number if necessary.) Click the "Submit" button to complete the initiation.
- Once an initiation date has been submitted, you'll be prompted to submit the new member's initial, pro-rated membership dues. The system will calculate the amount due automatically based on the initiation date you've submitted. If necessary, you can override this value. Click the "Submit Payment" button to complete the transaction.
- In the "Applications Ready for Affiliation" folder you'll see a list of all candidates awaiting affiliation. (Note that all candidates will ultimately wind up in either the initiation, affiliation, or reinstatement folder based on the "type" value associated with their application date. This value is populated automatically when the application date is created.) Click the "Affiliate" button next to the name of the candidate you'd like to affiliate.
- Type the affiliation date, as well as a "lost years" value if there's been a gap in membership. Click the "Submit" button to complete the affiliation.
- Once the affiliation date has been submitted, you'll be prompted to submit the member's pro-rated membership dues. The system will calculate the amount due automatically based on the affiliation date you've submitted. If necessary, you can override this value. Click the "Submit Payment" button to complete the transaction.
- In the "Applications Ready for Reinstatement" folder you'll see a list of all candidates awaiting reinstatement. Click the "Reinstate" button next to the name of the candidate you'd like to reinstate.
- Type the reinstatement date, as well as a "lost years" value if there's been a gap in membership. Click the "Submit" button to complete the reinstatement.
- Once the reinstatement date has been submitted, you'll be prompted to submit the member's pro-rated membership dues. The system will calculate the amount due automatically based on the reinstatement date you've submitted. If necessary, you can override this value. Click the "Submit Payment" button to complete the transaction.
How Do I Submit Dues Payments?
In CLMS2Web, dues payments can be submitted in multiple ways based on the specific situation and your personal preferences:
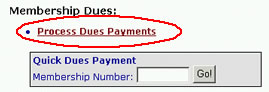
Process Dues Payments
- From the Roster Control Panel, click the link labeled, "Process Dues Payments."
- Find the member for whom you'd like process membership dues. (Your members are sorted first by their current paid-thru date, and then alphabetically.)
- Click the "Submit Dues" button next to the member's name. Based on the member's current paid-thru date, and their membership type (regular or life), the system will determine whether the dues are delinquent, current, or pre-paid, and suggest the appropriate allocations and total:
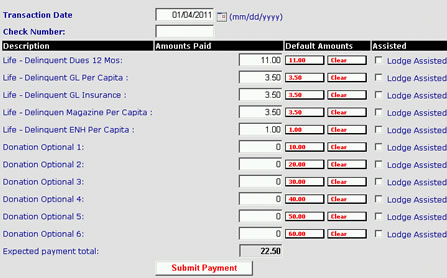
Note that optional dues are displayed on this screen if the amount due has been defined through the rates editing screen. Since optional dues are not required from members, these amounts are not included in the default payment amount, but can easily be included by clicking default amount button:

Amounts can be removed from the total by clicking the "Clear" button, and you can also edit the amount paid by overwriting the supplied value.
- If one or more of the payment allocations has been "lodge assisted" (for a member in financial need, for instance) click the check box labeled "Lodge Assisted."
- Click the "Submit Payment" button to submit the transaction.
Quick Dues Payment
In some situations in may be quicker to process a dues payment by inputting a membership number rather than selecting the member from a long list:

- Enter a membership number and click the Go! button.
- Confirm payment allocations:
- Click the "Submit Payment" button to submit the transaction.
Dues Payment Wizard
Dues payments may also be initiated from an individual member's roster record.
- To get started, simply select "Submit Dues Payment" from the Wizard drop down menu:
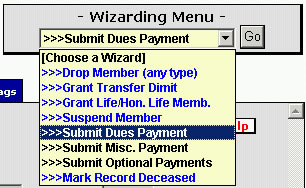
- Confirm the payment allocations and click the "Submit Payment" button to submit the transaction.
How Do I Transfer a Member In?
If an incoming transfer has been granted a transfer dimit to your lodge, you'll be alerted by counters on the "Incoming Transfers" link of the main menu, and the "Process Incoming Transfers" link of the Control Panel. Click either one of these links to display your transfer candidate(s):
To process an incoming transfer, click the "Process Transfer," button, and then supply the appropriate application date. Click the "Create New Account" button and the transfer's membership data will be imported automatically from his previous lodge. No muss, no fuss, no typing!
At this point in the process you'll be prompted to supply the application fee, if applicable. After you've clicked the "Submit Payment" button, you'll be taken automatically to the transfer's's new roster record, where you can make any required revisions. At this point, the transfer has been converted into a candidate for membership into your lodge, and can be processed just like any other candidate by clicking the "Process Candidates" link from the Control Panel. (Note that the transfer/candidate will not be listed as an official member of your lodge until all steps of the affiliation process are complete.)
What if my incoming transfer never shows up in my Incoming Transfers queue?
If an incoming transfer doesn't show up in CLMS2Web Incoming Transfer queue, contact the lodge secretary and ask him to grant the member a transfer dimit. If the lodge is closed or unable to grant the dimit for some other reason, you can manually add the transfer candidate to CLMS2Web by clicking "Add New Membership Candidate" link from the Control Panel. Choose the "is transferring to this lodge" option, and carefully follow the links to add the candidate manually.
Comments